Showing posts with label Tip. Show all posts

Wednesday, June 02, 2010

Tip to Make Neater and Nicer Picot

I love to make picot. I know some peoples find that making picot is boring and slowing down the crocheting process. Several people complain about the amount of picots that they have to make on Garden Path Shawl. I do understand their pain, because I used to hate making picot myself, until I improvised a bit.
Here what I always do whenever I have to make picot:


I found that this way, my picot prettier and more stable, plus it’s easier and faster to make. I hope you agree with me.

Friday, November 20, 2009

Magazine Folder

We always buy Fiori’s milk powder by a dozen complete with the master carton box. I always recycled the box and make it into something useful (I found this kind of box is sturdy and the color is neutral). This time, I made magazine folder since I really need to organize my desk. Using two of below master carton, I can make 5 magazine folders. Now my desk looked tidy plus I could save some money. Store bought magazine folder costs about RM 7 or USD 2, since I made 5 magazine folders, I saved about RM 35,- or USD 10,-


Milk master carton box


Ta..da!!


Magazine folder

Tuesday, January 06, 2009

Crocheted Lace to Lengthen the Dress


Lauri grows very fast. Most of her dresses are too short although width wise, she still can wear them. I suppose she could wear it with pants as a tunic, but I am afraid she will have difficulty to open the pant when she goes to the toilet in the kindy. So, I made crocheted lace to lengthen the dress. I just attached the lace with running stitch. The idea is, when she can not wear this dress anymore, I just take the lace and attach it to another dress that need to be lengthen.

Sunday, March 09, 2008

Solution To My Failed Blanket

Remember my post about failed blanket? Well, yesterday somebody emailed me the tip how to wash that.

"Was just reading your blog about the naturally dyed wool that you used for your blanket. Tip: when washing naturally dyed wool, never use laundry detergent - it is designed to digest anything organic, like perspiration, food, and natural dyes! I use hair shampoo (preferably, one for coloured hair), when I wash wool that I've dyed with natural dyes.

You may be able to even out the colour by placing it in a top-loading washing machine, with a good squirt of dish detergent, 2 or 3 tablespoons of vinegar, and raising the temperature to close to boiling, without aggitation. Leave it in the water to cool, moving it gently, from time to time (so the colour doesn't puddle). Then rinse carefully, spin and air dry. (I use a squirt of dish detergent, when dyeing to help the colour to take evenly. The vinegar should help to fix the dye better.)"

I tried to wash one square yesterday with shampoo. I don't have shampoo for coloured hair, so I just use normal shampoo that I normally use. It still bleed, but not too bad, and after it dried, I notice that the color is still nice and even. It works!

Thanks Lyn!

Tuesday, April 10, 2007

Handmade Label

I bought 6 mm wide satin ribbon and embroidery the word using normal sewing thread.
Actually, I was thinking to buy custom order label. However, I found the price is too pricey for me. Also, the idea of attaching something machine made on handmade item is a bit ironic.

Then I sew it on the hem:


It only took me less than 30 minutes. I think to spare 30 minutes to do this on handmade clothes that need more than 1 month to make is worth it, don’t you think?

Thursday, March 08, 2007

My Orchid (New Crocheted Project)

I bought yarns about 4 months ago from Elann. It is called Elann Sonata. Originally, I wanted to make Ivy from Knitty. When the yarn arrived, I was a bit disappointed with the quality of the yarn. It’s not as soft and shiny as I thought it would be.

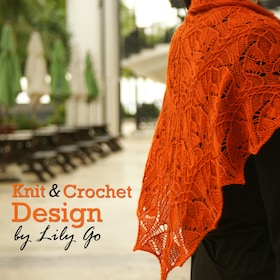
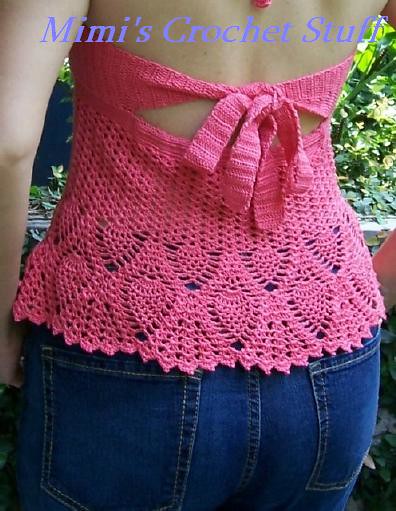
In the end I don’t use the yarn to make Ivy, instead I am using it to make another version of Wild Rose. I love my Wild Rose and wear it many times already, so I must make another one. This time I will call it Orchid. Although similar looking, but the construction entirely different. This version, crocheted from top down, raglan sleeve, you can try it as you crochet, all in one piece. Because of the empire waist styles, this top will be flattering for any body types. I love empire waist styles because it gives you the slim effect.


No, this is not my hand. This is Lauri, trying to crochet

At this moment, I am almost reaching the waist. Just tried it on before writing this post, and I love with the result. I am definitely will write down the pattern.

In case you are wondering, yes, I am splitting the yarn again. Elann Sonata yarn is in DK weight, so I split it into two to become fingering weight yarn.

Tip to split the yarn:
1. Unravel about 2 or 3 meter yarn, then tied the ball using rubber band
2. Split the yarn apart, make sure you pull the yarn tightly (ask for help or use your toes to hold), then wind the splited yarn at the same time. In short, you pull, split, wind at the same time, and slowly release the yarn bit by bit using your toes to control (or ask your helper to release bit by bit. But, make sure don’t loose the tight tension, otherwise the yarn will be in a tangled mess.
3. Hang the ball and let it spin before you unravel for more.
4. If your yarn got 9 ply, you split 2 first (3 ply and 6 ply), later you split the 6 plyinto 2 again.

Once I got somebody to take photo, I will post the photo tutorial how to split the yarn.

Sunday, February 25, 2007

Sage Cardigan Pattern on Sale

Finally I manage to finish writing down the Sage Cardigan pattern. Writing down pattern is not as easy as I though it would be. Every time I checked, I still manage to find some error. I wrote the pattern row to row, so no need to think, just follow the pattern. I also include the charted pattern if you preferred to follow the chart. Don’t be surprise with the total pages you have to print (32 pages total). I could change the font to smaller one, or resized the charted pattern so it would fit into 1 page. But, what is the point if you can not read it? If you prefer to follow the chart, print the chart only, but if you prefer the english instruction, just print that part.

Originally, I wanted to put this pattern for free. But, on second thought, because of the time I spent to write this pattern, I think I just have to put it on sale. Just email me if you are in doubt and want to ask question first.


Sizes: XS, S, M, L, XL, XXL, 3XL
Needle: 3.25 mm (size 3), 3.5 mm (size 4) knitting needle (straight/circular), 2.75 mm (size C) crocheted hook
Yarn: Fingering weight or double strand lace wight yarn (eg: Rowan 4-ply cotton, double strands of Jaegerspun Zaphyr). Yarn requirement for XS: 1200 meter, S: 1300 meter, M: 1400 meter, L: 1500 meter, XL: 1600meter, XXL: 1700 meter, 3XL: 1800 meter
Notion: Tapestry deedle, buttons (6 pcs), marker, scrap yarn
Gauge: 30 sts and 40 rows = 4” (10 cm) in Stockinette Stitch (St st) using 3.25 mm needle or adjust the needle size to get gauge. I agree that this is not a quick knit. There are a lot of stitches, but if you invest the time and quality yarn, you will get a timeless cardigan to love for years.
Difficulty: Adventurous beginner (you need to know how to do knit and purl, decrease and increase, make button holes, simple cable, short row, and crochet)
All entry about this Project: Click here


If your gauge is different from above, email me along with your measurement, I will advise you which size you should make.

Click on the button below to buy a copy. It will be sent to you in a zipped PDF file via email once payment is complete. Thanks!

US$ 5.00,-

add to cart


Tip:

I know it's very daunting to knit a project with small gauge. However, I found that knitting with bulky yarn and big needle doesn't give me good result. It's bulky and make me look fat.

So, what is the guarantee, after knitting so many hours using fine yarn and small needle, that the result will be satisfying? Knit the back first. Wash and block it. No need to stretch or pull so tight. Just pat it a bit and make sure it shape properly and lay flat. After it dried, compare it with your favourite cardigan. If it's match then continue, if it doesn't then at least you only need to redo the back part and not the whole thing :)

Friday, February 09, 2007

To Strengthen The Button Holes

First of all I would like to thank you for all the lovely comment on my Sage cardigan. Sorry if I could not reply to your comment because somehow some of the comment did not provide the replying email address.

I got a lot of question regarding splitting the yarn. Actually it’s not that difficult. I could split 1 balls of 100 gram (200 meter) in 2 hours. For the normal 50 gram balls yarn (100 meter), I could split within 1 hour.

Anyway, regarding my original plan to change the button, somehow I could not find any suitable bigger button to replace the current button on my sage cardigan. I decided to make the holes a bit smaller so it won’t pop out easily.

Using tapestry needle and a strand of yarn, I sew the round edge of the holes several times. This will also strengthen the holes.


As to stabilize the button, I put scrap clothes folded several times and sew it in the back of the button.